Saturday, January 30, 2010

Changing the Word 2003 Background Color

Maybe you don’t know that Word 2003 Background can be change! You can change it to any color that you like.

Why you need to create different backgrounds for your documents? These backgrounds often come in good when you are creating brochures/flyers or certificates.

There are five types of backgrounds available inMicrosoft Word 2003. They are solid color, gradient, texture, pattern, and picture. We will start with the solid colorbackgrounds.

To Create a Solid Color Background

  • From the Format menu, go to Background and choose a color. This will be your Word background color.


  • If you don't see a color that you want to use, click the More Colorsoption.

  • From the Color dialog box displayed, select the color that you want to use and click the OK button.

    To Create a Gradient Background

  • From the Format menu, go to Background and click the Fill Effects to display the Fill Effects dialog box.

  • There are 4 tabs – Gradient, Texture, Pattern and Picture that allow you to create different style of backgrounds.
  • The default was in the gradient tab. You need to select what type of color you want, one color, two colors, or preset. A preset is gradient backgrounds that are already made.
  • If you choose one color, select the color you want by dropping the box down on the right side of the screen.
  • If you select two colors, then choose the two colors that you want to use on the right side of the screen. For example, red and yellow
  • If you want to use one of the presets, tick the presets box and go through the presets and find the one that you want to use.
  • Under the Shading styles section, you can choose the different types of shading style to use. Here we choose the Diagonal up.
  • Under the Variants section, select the variant that you like.
  • Once you have completed, click the OK button. The output will be as follow.
  • Friday, January 15, 2010

    Modify Word normal dot template! How to prevent it?

    Do you know what is Word Normal.dot template? Word's master template.

    There are two basic types of files used in Word, that is .doc, which stands forDocument. The other is a .dot, which stands for Document Template.

    When Microsoft Word starts up it loads a template file called Normal.dot and you use this template to create all documents. Else, you can use customized template you've created before to create the documents.

    The Word Normal.dot template contains the basic layout (i.e. default font, page margins, styles, etc) and helps shape any documents created from this template. So, it’s important that you need to prevent accidental keystrokes or macro viruses from changing your Word defaults normal template.

    You can force Microsoft Word to ask you every time it closes whether you want to save the Normal.dot file. This way, if you know you made necessary changes to your default template you can save the file. Otherwise, you can help prevent mysterious or unintended changes by not overwriting the default template.

    To prevent accidental changes to Normal.dot template

  • From the Tools menu, click Options.
  • From the Options dialog box displayed, click the Save tab.

  • Check Prompt to save Normal template option.
  • Click OK.

    A fairly common question is: "How come every time I start a new document there's the same text already written on my page?" That's because, somehow, the user managed to open the blank document template (Normal.dot), typed something on the page, and saved the text to the Normal.dot, as well as whatever document name they saved the file. So they've altered the master template!

    To fix the problem, the user needs to reopen the Normal.dot file, remove the text and resave that master template file without the text. Then, when you open again a new Word document, the page will be empty.

    However, there are some basic customizations you can do that would probably allow you to work more efficiently. If you want all your documents, or the majority of them, created in a particular font, other than the Times New Roman (the default Normal.dot font), you can change that.

    To customize the Normal.dot template

  • Open a new blank Word document.
  • From the Format menu, click Font.
  • From the Font dialog box displayed, change the font you prefer as your default starting font face, style, color, size, etc.
  • Then, click on a Default button at the bottom of the dialog box. You'll be warned that this change will affect all new documents based on the Normal template.

  • Click Yes.

    Wednesday, December 30, 2009

    Discover A Nice Tool - Word Document Map!

    A Word Document Mapis useful when navigating a large document. It displays a list of headings in your document in a separate left hand pane of the screen. When you use this feature, Word will create a list based on itsheading styles (Heading1, Heading 2, and so on). The headings must be formatted using one of the built-in headingstyles.

    When you click on any of the headings in the map, Word will quickly jump to the corresponding heading in the document. TheDocument Map is to assist you when you are working on your document.

    To enable the Document Map

  • Open a Word document that already being formatted using the headingstyles.
  • From the View menu, click Document Map.
  • Here are the example:
  • To navigate a document with the Document Map

  • Open a Word document that already being formatted using the headingstyles.
  • From the View menu, click Document Map.
  • To display all headings at a specific level or higher, right-click a heading in the Document Map, and then click a number on the. For example, clickShow Heading 3 to display heading levels 1 through 3.
  • To collapse or expand the subordinate headings under an individualheading, click the minus (-) or plus (+) sign next to the heading.
  • To close, click the Document Map from the View menu again.
  • Tuesday, December 15, 2009

    Email Signature: How to Create or Modify it ?

    An email signature consists of text or pictures, or both. Microsoft Wordprovides the capability to email documents directly from Word. You can even use Word to create an e-mail signature file to be included with your messages.

    To create an e-mail signature

  • Open Microsoft Word.
  • From the Tools menu, click Options.
  • From the Options dialog box displayed, click the General tab.

  • Click E-mail Options button to display the E-mail Options dialog box.

  • From the Email Options dialog box displayed, click the E-mail Signature tab.
  • In the Type the title of your e-mail signature or choose from the listbox, type a name for your signature.
  • Under Create your e-mail signature box, insert the text or pictures, or both, that you want to use for a signature. (You can format the text using the available formatting tools).
  • When you finish, click OK to close the Email Options dialog box.
  • Click OK.

    To modify an e-mail signature

  • Open Microsoft Word.
  • From the Tools menu, click Options.
  • From the Options dialog box displayed, click the General tab.
  • Click E-mail Options button to display the E-mail Options dialog box.
  • From the E-mail Options dialog box displayed, click the E-mail Signature tab.
  • In the Type the title of your e-mail signature or choose from the listbox, click the signature you want to change.
  • Under Create your e-mail signature box, make the necessary changes.
  • Click Replace.
  • Monday, November 30, 2009

    Word Paste Special: It's different from Normal Paste!

    What you can do with the Word Paste Special? Let’s see…

    Word typically preserves all formatting when you copy or cut information from a Web page or other documents and paste it into a Word document. Sometime this is good and helpful, but it can get annoying --such as when you copy the text from web that happens to be a hyperlink and Word inserts the link into your document.

    There is a simple way to avoid pasting text with all that formatting using the paste special feature.

    To use Paste Special to paste unformatted text

  • Copy the text from other sources (i.e. Web or Word document)
  • Open Microsoft Word, where you wish to paste the text.
  • From the Edit menu, click Paste Special

  • From the Paste Special dialog box displayed, select Unformatted Text.
  • Click OK. You'll insert the words themselves, without all that extraneous formatting.
  • Sunday, November 15, 2009

    Word keyboard shortcuts: Use Macro to Generate It Automatically!

    Did you know that you can automatically generate a document listing all the Microsoft Word keyboard shortcuts, which you can then print or save etc?

    Here's a step-by-step on how to automatically produce a comprehensive list of keyboard shortcuts:

    To generate list of keyboard shortcuts

  • Open Microsoft Word 2003.
  • From the Tools menu, point to Macro and click on the Macros.
  • Word Macro dialog box
  • From the Macros dialog box displayed, in the Macros in: drop down menu, choose Word commands.
  • In the Macro name: box, choose ListCommands (you can just type in rather than scrolling through the long list in the box).
  • Word Macro dialog box
    Click the Run button.
    List commands dialog box
  • From the List Commands dialog box displayed, choose All Word commands.
  • Click OK and the document listing the keyboard shortcuts is generated, which you can save or print as you wish.
  • Friday, October 30, 2009

    Word Password Protection - Can it Protect your Word Documents?

    The Word password protection feature can be use to protect yourpersonal document from being open by other people that can access to your PC.

    If you share a computerwith someone else or you work in a multi-user environment where it is possible for others on your network to gain access to your hard drive, you may want to assign password protection to some of your documents containing sensitive information.

    To assign password protection in Word

  • From the Tools menu, click Options.
  • word options
  • From the Options dialog box displayed, click the Security tab
  • Under the File encryption options for this document section enter a password in the box labeled Password to open:
  • The Advanced… button opens a dialog box that allows you to specify more options, such as whether you wish to protect the document properties.
  • Click OK will open the Confirm Password dialog box.
  • Word Password box
  • Retype the same password again and click OK to save your password.
  • Click OK.

    Note: If you do not want other to modify your document, enter a password in the Password to modify: box under the File sharing options for this document section.

  • Thursday, October 15, 2009

    Controlling Word Page Break

    Word Page break is the point at which one page ends and another begins. Microsoft Wordinserts an "automatic" (or soft) page break for you, or you can force a page break at a specific location by inserting a "manual" (or hard) pagebreak.

    For some types of documents you may want to make sure that any given paragraph appears all on one page or another. Word includes a formatting feature that allows you to ensure that paragraphs stay together without a page break in the middle of them.

    You can control this by setting pagination options.

    To set the page break pagination options

  • Select/highlight the paragraph or paragraphs that contain lines you want to keep together.
  • From the Format menu, click Paragraph.
  • From the Paragraph dialog box displayed, make sure the Line and Page Breaks tab is selected.
  • Select the appropriate check box:

    Widow/Orphan control: Control widow and orphan lines. This option is turned on by default.
    Keep lines together: To keep lines of a paragraph together on a page or in a column.
    Keep with next: To paragraphs together on a page or in a column.
    Page break before: Always force a page break before a paragraph.

  • Click on OK button.
  • Wednesday, September 30, 2009

    Word Backup – Create backups of Word documents Automatically

    How to use the Word backup to create backup copies of your documents?

    This is important and critical! You never know when you are going to need to recover aprevious version of your document due to a power failure, document problem, or simply human error while cleaning out some of the files from your hard drive.

    Here we show you the steps that you can have Word create automatic backups for you:

    To create automatic backups of Word documents

  • From the Tools menu, select Options.
  • From the Options dialog box displayed, click on the Save tab, check theAlways create backup copy option.
  • Tuesday, September 15, 2009

    Word Symbol and Word Special Character

    Word Symbol are character that do not appear on the computer keyboard or difficult to type using the normal keyboard.

    If you are looking for a special character such as the different country currency sign or the copyright or trademark symbols, here we show you how to find it.

    Follow the guides here:

    To insert a symbol

  • Click where you want to insert the symbol.
  • From the Insert menu, click Symbol to open the dialog box.
  • From the Symbol dialog box displayed, click the Symbol tab.

  • In the Font: drop-down box, click the font that you want.
  • Select the symbol you want to insert and click the Insert button.
  • Click Close button.

    To insert a Word special characters

  • Click where you want to insert the special character.
  • From the Insert menu, click Symbol to open the dialog box.
  • From the Symbol dialog box displayed, click the Special Characters tab.

  • Select the character you want to insert and click the Insert button.
  • Click Close button.
  • Sunday, August 30, 2009

    The Word Table of Contents: Create Document TOC with few Clicks!

    A Word table of contents (TOC) is a guide at the beginning of a document/book that tells the reader where to find sections within a document. Thetable of contents lists section headings and their corresponding page numbers.

    Microsoft Word has a wonderful built-in function to create atable of contents, using headings within adocument or from an outline. Here we will tell you how to create a TOC using heading styles.

    To create a Word Table of Contents

  • Make sure your document is finished and formatted with heading styles.
  • Position your cursor at the place in the document you'd like the TOC to appear.
  • From the Insert menu, point to Reference and click on Index and Tables.
  • Word Table of Contents
  • From the Index and Tables dialog box displayed, click the Table of Contents tab.
  • Under the General section, choose the pre-defined styles Formats: .
  • Indicate the heading depth you would like displayed in the TOC by modifying the Show levels: box.
  • Other options already pre-selected by default:
    Show page numbers: You can show (or omit) page numbers in the TOC.
    Right align page numbers: Make your page numbers right align in the TOC.
  • You can modify the Tab leader, which controls the appearance of the space between the end of the section title and the page number in the TOC.
  • Once finish, click OK.

    To update a Table of Contents

  • Right click on the area to the left (or within) the TOC and select Update Field from the pop-up menu. This will display the Update Table of Contents dialog box.
  • Update Table of Contents
  • From the Update Table of Contents dialog box displayed, you can choose to update page numbers only or entire table.
  • Click OK button.

    To delete a Table of Contents

  • Select or highlight the entire TOC.
  • Press the Delete key.
  • Saturday, August 15, 2009

    Word 2003 Paragraph Indent Feature

    Paragraph Indent is the amount of horizontal space of the paragraph i.e. offset them to the right or left of the body text margin.

    To apply the paragraph indent

  • Select the paragraph you wish to indent or place the insertion point in the paragraph you wish to indent.
  • From the Format menu, click Paragraph.
  • paragraph indent dialog box
  • From the Paragraph dialog box, select the Indents and Spacing tab (if not ready displayed).
  • In the Indentation section, enter a positive number in the Left: box (try 0.5”)
  • Click OK. This will offset the entire paragraph to the right.Note: If you enter a positive number in the Right: box, this will offset the entireparagraph to the left (from the paragraph right hand side)

    Tip: You can apply the negative indent too. Just enter the negative number to the Left: or Right: box.

    To apply the first line indent

  • Select the paragraph you wish to indent or place the insertion point in the paragraph you wish to indent.
  • From the Format menu, click Paragraph.
  • From the Paragraph dialog box, select the Indents and Spacing tab (if not ready displayed).
  • First line indent
  • In the Indentation section, choose First line from the Special: drop down menu.
  • You can modify the range in the By: box, the default is 0.5”.

    To apply the hanging indent

  • Select the paragraph you wish to indent or place the insertion point in the paragraph you wish to indent.
  • From the Format menu, click Paragraph.
  • From the Paragraph dialog box, select the Indents and Spacing tab (if not ready displayed).
  • In the Indentation section, choose Hanging from the Special: drop down menu.You can modify the range in the By: box, the default is 0.5”.
  • Thursday, July 30, 2009

    Word 2003 Header and Footer - How to use it?

    Word Header and Footer allow you to insert information at the top or bottom of every page. This informationnormally consists of chapter headings, pagenumber, etc.

    You can see header and footer information on your screen when in Print Layout View andPrint Preview, but not in the Normal view.


    To create a header or footer

  • From the View menu, click Header and Footer.
  • Word changes to Print Layout view and the Header and Footer toolbar is displayed.
  • Outlines of the Header and Footer text entry boxes appear at the top (header) and bottom (footer) of the page.
  • header and footer
  • Insert the text for the header or footer in the appropriate text entry box. You can just type any text that you like.
  • You can change between header or footer by clicking on the Switch Between Header and Footer icon.
  • You also can click on the appropriate Header and Footer toolbar icons to insert the page number, time, date, etc in the header or footer. The following options are available:

    IconFunction
    Insert AutoTextInserts the default auto text.
    Insert PageNumberInserts page number into the header or footer.
    Insert Number of PagesInserts the total number of the document.
    Format PageNumberFormat the page number.
    Insert DateInserts the current date.
    Insert TimeInserts the current time.
    Page SetupOpens the Page Setup dialog box.
    Show/Hide Document TextDisplays or hides document text.
    Same as PreviousSection header/footers should be the same as the previous section, or new.
    Switch BetweenHeader and FooterToggle between allowing you to edit the header and footer.
    Show PreviousShows the previous section header/footer (only useful where a document is made up of multiple sections).
    Show NextShows the next section header/footer (only useful where a document is made up of multiple sections).

  • When you have entered your header and footer text, click on the Closebutton on the Header and Footer toolbar.


    To move text in the header or footer text entry box

  • From the View menu, click Header and Footer.
  • In the Header or Footer text entry box, press the Tab key on your keyboard to move the cursor to the middle or right hand side of the entry box.
  • You also can use the Align Left, Right, Center, or Justify icons on theFormatting toolbar to do this.
  • Wednesday, July 15, 2009

    Free Envelope Printing Software!

    Yes, you can use the free envelope printing software to help you printing the envelopes effortless in Word.

    However, Microsoft Word Envelopes and Labels feature also can be use to print envelopes. Here is the guide:

    To add information to an envelope

  • Open a blank document in Microsoft Office Word.
  • From the Tools menu, point to Letters and Mailings submenu, and click on Envelopes and Labels.
  • From the Envelopes and Labels dialog box displayed, click onEnvelopes tab, and key in the Delivery Address and Return Addresscolumn.
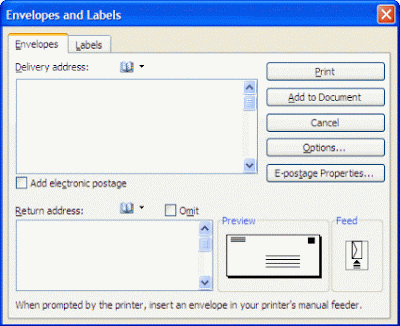
  • Envelopes and Labels dialog box
    Click on the Options button in the Envelopes and Labels dialog box.
    This will display the Envelope Options dialog box.
    Envelope Options dialog box
  • Under the Envelope size: section, choose the size of your envelope.
  • If you are in US, you can choose the Delivery point bar code option before click on the OK button.
  • This will back to the Envelopes and Labels dialog box, click the Printbutton will print.
  • Note: The delivery point bar code is used by the sorting machines at theUnited States Postal Service to help route mail more efficiently. Depending upon what you’re mailing, you can save money on your postage by printing the delivery point bar code on an envelope. To learn more about saving money using this feature, visit the US Postal Service website athttp://www.usps.com.

    To utilize free envelope printing software

    Here are two freeware envelope printing software that makes printing envelopes effortless:

    1.) Free Envelope Printing Software: Envelope Wizard

    This program will guide you through the steps, necessary for using your computer and printer for addressing an envelope. At each step along the way, you be asked to provide information for addressing the envelope. You may then proceed to the next step, if you find that you have made a mistake in a previous step, you can back up and redo it. Click Here to download.

    2.) Free Envelope Printing Software: Quick Envelopes

    This free software also easy to use and it covers all most commonly used envelopes. Get it free by clicking here.