Saturday, May 30, 2009

Customizing Microsoft Word Keyboard Shortcut


Customizing Microsoft Word Keyboard Shortcut keys is easy.

You can create customized keyboard shortcuts in anydocument, or anytemplate.


When you create a shortcut, you must make sure you’re putting it in the right place:

  • If you want your shortcuts to be available whenever you’re using Word, create them in Normal.dot. Normal.dot is a global template loaded all the time when Word is running.
  • If you need a shortcut only in documents based on a particular template, create it in that template.
  • If you need a shortcut only in a particular document, create it in thatdocument.

  • To Create a new Microsoft Word Keyboard Shortcut

  • From the Tool menu, click on the Customize button.
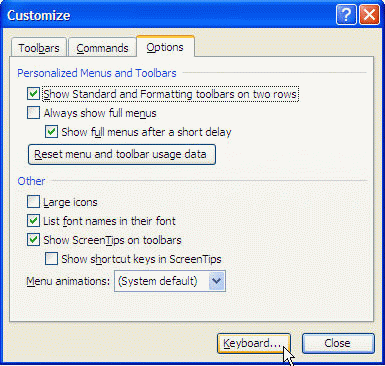
  • From the Customize dialog box displayed, click on the Keyboard button to display the Customize Keyboard dialog box.
  • Customize dialog box
    The Customize Keyboard dialog box lets you assign a keyboard shortcut to almost any command, macro, font, AutoText entry, style, or common symbol.
    Customize Keyboard dialog box
  • In the Categories: list box, select the category of item for which you want to create or change the keyboard shortcut. The list box to the right of the Categories: list box changes its name to match the category you select.

    - Each of the eight menu categories (File, Edit, View, Insert, Format, Tools, Table, and Window and Help) lists the commands associated with that menu. The more commonly used commands appear on the menus, while the less-used commands don’t appear. For example, the FilePrint command appears on the File menu as the Print command, but the FileConfirmConversions command doesn’t appear.
    - The Drawing category lists the commands associated with the Drawing toolbar.
    - The Borders category lists the commands associated with the border buttons on the Tables and Borders toolbar.
    - The Mail Merge category lists the commands associated with the Tools > Letters and Mailings submenu (in Word 2003 and XP) and with the Mail Merge toolbar.
    - The All Commands category lists all Word commands. Because there are so many commands, this list is awkward to use, so you’ll probably want to use it only when you can’t remember which menu a command is associated with.
    - The Macros category lists all the macros available in the active document and templates.
    - The Fonts category lists the fonts installed on Windows XP.
    - The AutoText category lists the AutoText entries defined in Word.
    - The Styles category lists the styles available in the active document and templates.
    - The Common Symbols category lists frequently used symbols (such as dashes, ® and © marks, and paragraph marks).

  • In the Commands: list box, select the command for which you want to create or change a keyboard shortcut. Word displays any existing keyboard shortcut for the command in the Current Keys: list box.
  • If you wish to assign the keyboard shortcut for a specific command, key in the shortcut in the Press new shortcut key: text box.
    Note: If this shortcut is currently assigned to another command, Word displays the Currently Assigned To line listing the command, so that you’ll know which existing shortcut you’re about to overwrite. Choose a different keyboard shortcut if necessary.
  • Click the Assign button to assign the keyboard shortcut to the command.
  • Click the Close button to close the Customize Keyboard dialog box.

    To Remove and Reset Microsoft Word Keyboard Shortcut

  • From the Tool menu, click on the Customize button.
  • From the Customize dialog box displayed, click on the Keyboard button to display the Customize Keyboard dialog box.
  • In the Save changes in: list box, choose which document or template you want to affect, and select the command so that Word displays the current keyboard shortcut.
  • Select the shortcut in the Current keys list box, and then click the Remove button.
  • To reset all keyboard shortcuts in the specified document or template to their default settings, click the Reset All button.
  • Immediately Word will prompt a confirmation message, just click the Yes button.

    Note: The Reset All button isn’t available until the document or template contains customized keyboard shortcuts. After removing or resetting Microsoft Word keyboard shortcuts, save the document or template.
  • Friday, May 15, 2009

    "Step-by-step Guides to Document Printing"

    Document printing is easy right? Just click on the print icon!

    But before you print,Microsoft Word requires that a printer driverhas been installed in your computer and matches the printer you are currently using. ONthe printer.

    The 3-step below guides you to proper document printing inMicrosoft Word:

    Step 1: To Preview a Document

  • Place the insertion point in the page where you want the documentpreview to begin.
  • From the File menu, click Print Preview.
  • Click once in the document to view it more closely and click again to zoom back out.
  • On top of the screen, you will see the Print Preview toolbar. Each of the toolbar icon will have their own function as describe below:
  • Print Preview toolbar
  • PrintThe document is send to the printer.
    MagnifierThe same as clicking inside the document. It gives a single-level zoom.
    One PageSingle-page view.
    Multiple PagesAllows you to print preview up to six pages at a time on the screen.
    Zoom ControlAllows you to control Zoom view percentages.
    View RulerAllows you to view the ruler showing tabs and measurements.
    Shrink to FitEnables you to fit a document that is just more than one page long into a single page.
    Full screenAllows you to change to Full Screen view.
    CloseAllows you to leave Print Preview and return to the MS Word screen.

    Note: The step 1 of document printing here is to let you see (preview) the document. If you satisfied, only proceed to the step 2 otherwise just make the necessary changes.

    Step 2: To Change the Printer Settings

  • From the File menu, click Print.
  • From the Print dialog box displayed, you needs to do some settings as describe below:
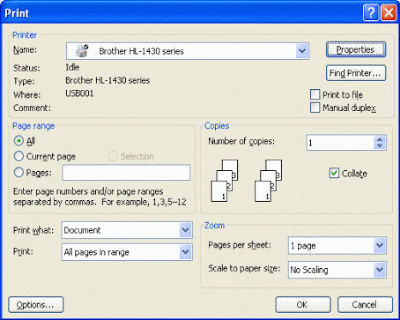
  • Print dialog box

  • Printer:
    NameSelect the printer you wish to use from the list of installed printers.
    Properties buttonImportant! Refer below.
    Print to fileWill print the document to another file, rather than the printer.

    Page range:

    AllWill print all the pages of a document.
    Current pageWill print the current page only.
    PagesAllows you to print a single page, a range of pages, or disconnected ranges of pages. Enter the value such as 1, 5-9, 18, 25-33.

    Print what:

    DocumentWill print the document (normally we choose this option).
    Document PropertiesWill print summary information about the current document such as file size, word count, etc.
    Document Showing markupWill print the document that show markup. Note: Markup features can quickly see who made changes to your document, because Word color codes changes by reviewer.
    List of markupWill print the list of markup.
    StylesWill print the construction and set up of the styles for the current document.
    AutoText entriesWill print the AutoText entries for the current document.
    Key assignmentsWill print the keystroke assignments that are used inMicrosoft Word.

    Print:

    All pages in rangeWill print all of the pages in a specified range.
    Odd pagesWill print only the odd pages of a document.
    Even pagesWill print only the even pages of a document.

    Copies:

    Number of copiesEnter the number in the box will specify the number of copies that you wish to print the document.
    CollateWill print an entire copy of a document before the next copy of it begins to print. When you select this option, MS Word creates the number of copies specified, and then sends all the copies tothe printer. Printing takes longer if you choose the option.

    Zoom:

    Pages per sheet:Will specify the number of pages in a sheet of paper, range from 1 page up to 16 pages.
    Scale to paper size:Specify the different types of paper size to be use.

    The Properties Button

    Important: You need to click on this button, as it will let you set the printing paper size, paper orientation, color or black/white printing, etc.

    This is critical, as it will affect the printing output. However, different printer installed will have slightly different settings. Click OK when finish and return to the Print dialog box.
    Note: The step 2 of document printing is very important as you are required to change the printer related settings so that the outputs come out will fulfill your needs.

    Step 3: To Print

  • To accept the printer selection and setup, and print the document clickon the OK button.
  • Before hit the OK button, ensure that you have put the plain papers tothe printer tray.
  • To return to your document without printing, choose Cancel.
  •