Saturday, February 28, 2009

Paragraph Formatting in Word 2003

Microsoft Word paragraph formatting is the changes that will effects the entire paragraph in a document. What is the thing that you can change?

The format of a paragraph can be changed by setting tabs, indenting, aligning, changing line spacing between and within a paragraph, etc. All these features allow you to enhance the appearance of your document.

Follow the step-by-step guides below:


To apply the paragraph formatting

  • Select the paragraph you want to apply the format.
  • From the Format menu, click Paragraph.
  • From the Paragraph dialog box displayed, do the appropriate changes and click the OK button.
  • paragraph dialog box

    To align text

  • Select the text you wish to align (Recommended whole paragraph).
  • In the General section Alignment menu, select one of the option:

  • Align Left (Ctrl+L)Aligns text flush with the left margin. This is the defaultsetting.
    Center (Ctrl+E)Centers text between the left and right margins.
    Align Right (Ctrl+R)Aligns text flush with the right margin.
    Justify (Ctrl+J)Spreads text evenly between the left and right margins by expanding or reducing the space between individual words.
    Distributed (Ctrl+Shift+J)Distributes text between the left and right margins. This is clear if your text is short (less than a line).


    Paragraph Formatting - Indentation

    Indentation determines the amount of horizontal space of the paragraphi.e. from where the starting typing point of a paragraph.


    To indent a paragraph

  • Select the paragraph you wish to indent or place the insertion point in the paragraph you wish to indent.
  • From the Format menu, click Paragraph.
  • From the Paragraph dialog box, select the Indents and Spacing tab (if not ready displayed).
  • In the Indentation section, you can choose from the following options:

  • LeftAligns the paragraph to the left-hand margin when you enter a positive number. Entering a negative number will align aparagraph to the left of the left-hand margin.
    RightAligns the paragraph to the right-hand margin when you enter a positive number. Entering a negative number will align aparagraph to the right of the right-hand margin.
    SpecialDetermines whether the indent is to be a First line or Hanging indent.
    First LineTo indent the first line of the paragraph only.
    HangingTo create a Hanging indent.
    NoneNo indentation.
    ByTo determines the distance of the indent from the margins, in tenths of an inch. To increase or decrease of the value, use the up and down arrows.


    Paragraph Formatting - Line spacing

    Line spacing determines the amount of vertical space between lines of text. The line spacing you select will affect all lines of text in the selectedparagraph or in the paragraph that contains the insertion point.


    To adjust line spacing

  • Place the insertion point where you want to enter new text with new line spacing, or select the text you wish to modify the line spacing.
  • From the Format menu, click Paragraph.
  • From the Paragraph dialog box, the following options available:

  • BeforeAdjusts the line spacing above selected lines, in point size.
    AfterAdjusts the line spacing below selected lines, in point size.
    Line SpacingThe line spacing is automatically specified according to the tallest character on each line. The options for default line spacing include Single, 1.5 lines, Double, At least (current point size), Exactly, and Multiple lines
    SingleThe default setting. Specifies single spacing, does not add any additional space between lines.
    1.5 LinesSpecifies one and a half line spacing, and adds half a line of additional spaces between lines.
    DoubleSpecifies double spacing, and adds a single line of additional spaces between lines.
    At leastSpecifies the minimum amount of space between lines. MS Word for Windows will add any additional space required.
    ExactlySpecifies a fixed amount of space between lines. MS Word for Windows will not add any additional space, even if it is required.
    MultipleSetting the line spacing to a multiple of 1.2 is equivalent to 20% and to a multiple of 0.8 is equivalent to -20%. Setting the linespacing at a multiple of 2 is equivalent to setting the linespacing at Double. In the At box, type or select the line spacing you want. The default is three lines.

    Note: Proper adjust the paragraph formatting will have a big effect on the overall look of the entire paragraph and document itself.

    Sunday, February 15, 2009

    Formatting Toolbar and Text Formatting in Word 2003

    The formatting toolbar is a toolbar that contains icons on it as shown below. Each of the icons has a specific purpose that can change the outlook of your document text when you apply to it.
    word formatting toolbar pic1The formatting toolbar is designed to apply many effects of text. Here is the list of icons and it function:
    IconFunction
    Style MenuAllows you to define a group of paragraph andcharacter formats as a style, and then the styles in a style sheet.
    Font MenuClick the arrowhead to the right of the font name box to view the list of fonts available. Scroll down to the font you want and click once to select it.
    Font SizeClick on the white part of the font size box to enter a value for the font size or click the arrowhead to the right of the box to view a list of font sizes available. Select a size by clicking on it once. A font size of 10 or 12 is best for paragraphs of text.
    Font StyleUse these buttons to bold, italic and underline the selected text.
    AlignmentText can be aligned to the left, center, or right side of the page or it can be justified and distributed across the page.
    Line SpacingAllows you to set the amount of space between one line to another line.
    Numbering and BulletsIt is used to set-off and emphasize sections of text and are presented by dots or numbers.
    Increase/Decrease IndentChange the indentation of a paragraph in relation to the side of the page.
    Outside BorderAdd a border around selected text.
    HighlightUse this option to change the color behind a selected text. The color shown on the button is the last color used. To select a different color, click the arrowhead next to the button.
    Font ColorThis option changes the color of the text. The color shown on the button is the last color chosen. Click the arrowhead next to the button to select another color.


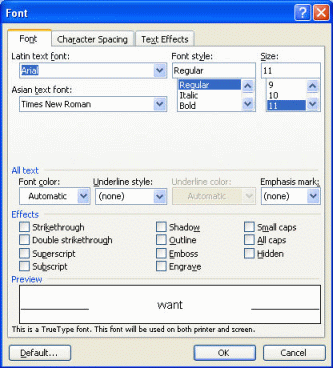
    To change the font used by selected text

  • Select the text that you wish to apply a different font to. This can be any amount of text in the document from the single character, a word, a sentence, a paragraph, or the entire document.
  • From the Format menu, click Font.
  • word formatting toolbar pic2
  • From the Font dialog box, change from the following options:

  • Text fontSpecifies the overall look of the character set.
    Font StyleDetermines the emphasis given to a character, i.e. Bold or Italic.
    SizeDetermines the size of the character in points. The higher the points, the larger the character will be.
    Font ColorDetermines the color of the text as it appears on the screen.
    Underline styleDetermines whether you have None, Single, Double, or Word Only underlining etc.
    Underline ColorDetermines the underline color of the text appears on the screen. Only available after you choose the underline style.
    StrikethroughA strikethrough line is drawn through selected characters.
    Double StrikethroughTwo strikethrough lines are drawn through selected characters.
    SuperscriptText is raised above its normal position on the text line.
    SubscriptText is lowered below its normal position on the text line.
    ShadowAdds a shadow behind the text.
    OutlineDisplays the inner and outer borders of each character.
    EmbossText appears to be raised off the page in relief.
    EngraveText appears to be printed or pressed into the page.
    Small capsText is formatted in capital letters (smaller size).
    All capsText is formatted in capital letters (normal size).
    HiddenCharacters are hidden on the page.
    PreviewThe effect of the font is displayed before you apply it.
  • When finish, click on the OK button or press Enter.


    To highlight pre-selected text

  • Select the text you wish to highlight.
  • Click on the Highlight icon on the Formatting toolbar and the selected text will be displayed with a yellow box around it.


    To remove highlighting from text

  • Select the text that the highlighting is to be removed from.
  • Click on the Highlight icon on the Formatting toolbar.


    To change the color used for highlighting

  • Click on the down arrow to the right of the Highlight icon on theFormatting toolbar. This will display a range of colors that you can select from. Once you have selected an alternative this will become the default highlight color, until you select a different color.
  •