Wednesday, December 30, 2009

Discover A Nice Tool - Word Document Map!

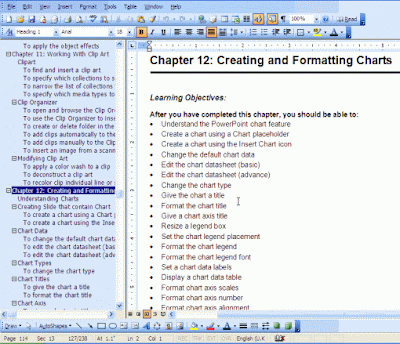
A Word Document Mapis useful when navigating a large document. It displays a list of headings in your document in a separate left hand pane of the screen. When you use this feature, Word will create a list based on itsheading styles (Heading1, Heading 2, and so on). The headings must be formatted using one of the built-in headingstyles.

When you click on any of the headings in the map, Word will quickly jump to the corresponding heading in the document. TheDocument Map is to assist you when you are working on your document.

To enable the Document Map
  • Open a Word document that already being formatted using the headingstyles.
  • From the View menu, click Document Map.
  • Here are the example:
  • To navigate a document with the Document Map

  • Open a Word document that already being formatted using the headingstyles.
  • From the View menu, click Document Map.
  • To display all headings at a specific level or higher, right-click a heading in the Document Map, and then click a number on the. For example, clickShow Heading 3 to display heading levels 1 through 3.
  • To collapse or expand the subordinate headings under an individualheading, click the minus (-) or plus (+) sign next to the heading.
  • To close, click the Document Map from the View menu again.
  • Tuesday, December 15, 2009

    Email Signature: How to Create or Modify it ?

    An email signature consists of text or pictures, or both. Microsoft Wordprovides the capability to email documents directly from Word. You can even use Word to create an e-mail signature file to be included with your messages.

    To create an e-mail signature

  • Open Microsoft Word.
  • From the Tools menu, click Options.
  • From the Options dialog box displayed, click the General tab.

  • Click E-mail Options button to display the E-mail Options dialog box.

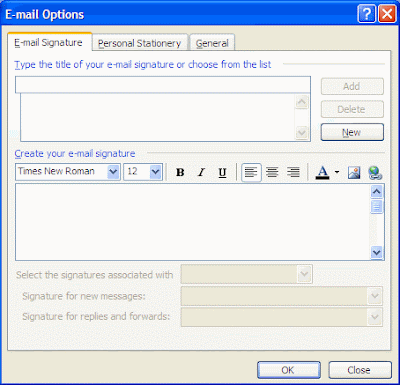
  • From the Email Options dialog box displayed, click the E-mail Signature tab.
  • In the Type the title of your e-mail signature or choose from the listbox, type a name for your signature.
  • Under Create your e-mail signature box, insert the text or pictures, or both, that you want to use for a signature. (You can format the text using the available formatting tools).
  • When you finish, click OK to close the Email Options dialog box.
  • Click OK.

    To modify an e-mail signature

  • Open Microsoft Word.
  • From the Tools menu, click Options.
  • From the Options dialog box displayed, click the General tab.
  • Click E-mail Options button to display the E-mail Options dialog box.
  • From the E-mail Options dialog box displayed, click the E-mail Signature tab.
  • In the Type the title of your e-mail signature or choose from the listbox, click the signature you want to change.
  • Under Create your e-mail signature box, make the necessary changes.
  • Click Replace.
  •