Thursday, July 30, 2009

Word 2003 Header and Footer - How to use it?

Word Header and Footer allow you to insert information at the top or bottom of every page. This informationnormally consists of chapter headings, pagenumber, etc.

You can see header and footer information on your screen when in Print Layout View andPrint Preview, but not in the Normal view.


To create a header or footer

  • From the View menu, click Header and Footer.
  • Word changes to Print Layout view and the Header and Footer toolbar is displayed.
  • Outlines of the Header and Footer text entry boxes appear at the top (header) and bottom (footer) of the page.
  • header and footer
  • Insert the text for the header or footer in the appropriate text entry box. You can just type any text that you like.
  • You can change between header or footer by clicking on the Switch Between Header and Footer icon.
  • You also can click on the appropriate Header and Footer toolbar icons to insert the page number, time, date, etc in the header or footer. The following options are available:

    IconFunction
    Insert AutoTextInserts the default auto text.
    Insert PageNumberInserts page number into the header or footer.
    Insert Number of PagesInserts the total number of the document.
    Format PageNumberFormat the page number.
    Insert DateInserts the current date.
    Insert TimeInserts the current time.
    Page SetupOpens the Page Setup dialog box.
    Show/Hide Document TextDisplays or hides document text.
    Same as PreviousSection header/footers should be the same as the previous section, or new.
    Switch BetweenHeader and FooterToggle between allowing you to edit the header and footer.
    Show PreviousShows the previous section header/footer (only useful where a document is made up of multiple sections).
    Show NextShows the next section header/footer (only useful where a document is made up of multiple sections).

  • When you have entered your header and footer text, click on the Closebutton on the Header and Footer toolbar.


    To move text in the header or footer text entry box

  • From the View menu, click Header and Footer.
  • In the Header or Footer text entry box, press the Tab key on your keyboard to move the cursor to the middle or right hand side of the entry box.
  • You also can use the Align Left, Right, Center, or Justify icons on theFormatting toolbar to do this.
  • Wednesday, July 15, 2009

    Free Envelope Printing Software!

    Yes, you can use the free envelope printing software to help you printing the envelopes effortless in Word.

    However, Microsoft Word Envelopes and Labels feature also can be use to print envelopes. Here is the guide:

    To add information to an envelope

  • Open a blank document in Microsoft Office Word.
  • From the Tools menu, point to Letters and Mailings submenu, and click on Envelopes and Labels.
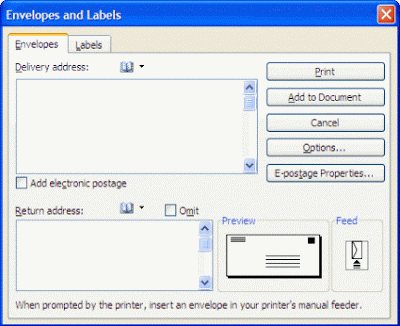
  • From the Envelopes and Labels dialog box displayed, click onEnvelopes tab, and key in the Delivery Address and Return Addresscolumn.
  • Envelopes and Labels dialog box
    Click on the Options button in the Envelopes and Labels dialog box.
    This will display the Envelope Options dialog box.
    Envelope Options dialog box
  • Under the Envelope size: section, choose the size of your envelope.
  • If you are in US, you can choose the Delivery point bar code option before click on the OK button.
  • This will back to the Envelopes and Labels dialog box, click the Printbutton will print.
  • Note: The delivery point bar code is used by the sorting machines at theUnited States Postal Service to help route mail more efficiently. Depending upon what you’re mailing, you can save money on your postage by printing the delivery point bar code on an envelope. To learn more about saving money using this feature, visit the US Postal Service website athttp://www.usps.com.

    To utilize free envelope printing software

    Here are two freeware envelope printing software that makes printing envelopes effortless:

    1.) Free Envelope Printing Software: Envelope Wizard

    This program will guide you through the steps, necessary for using your computer and printer for addressing an envelope. At each step along the way, you be asked to provide information for addressing the envelope. You may then proceed to the next step, if you find that you have made a mistake in a previous step, you can back up and redo it. Click Here to download.

    2.) Free Envelope Printing Software: Quick Envelopes

    This free software also easy to use and it covers all most commonly used envelopes. Get it free by clicking here.